DESIGN YOUR HRV
STEP BY STEP DESIGN GUIDE

Step 1
To design an HRV installation, first identify what indoor air problems you want to overcome, so that you can determine whether you need one or a combination of the following HRV types:
- Whole house ducted system with one HRV (one level)
- Whole house system with 2 HRVs (as for a large house)
- Two floor home with living downstairs
- Two floor home with living upstairs,
- Part house system for smaller homes
- Single room system
- Architectural homes
Step 2
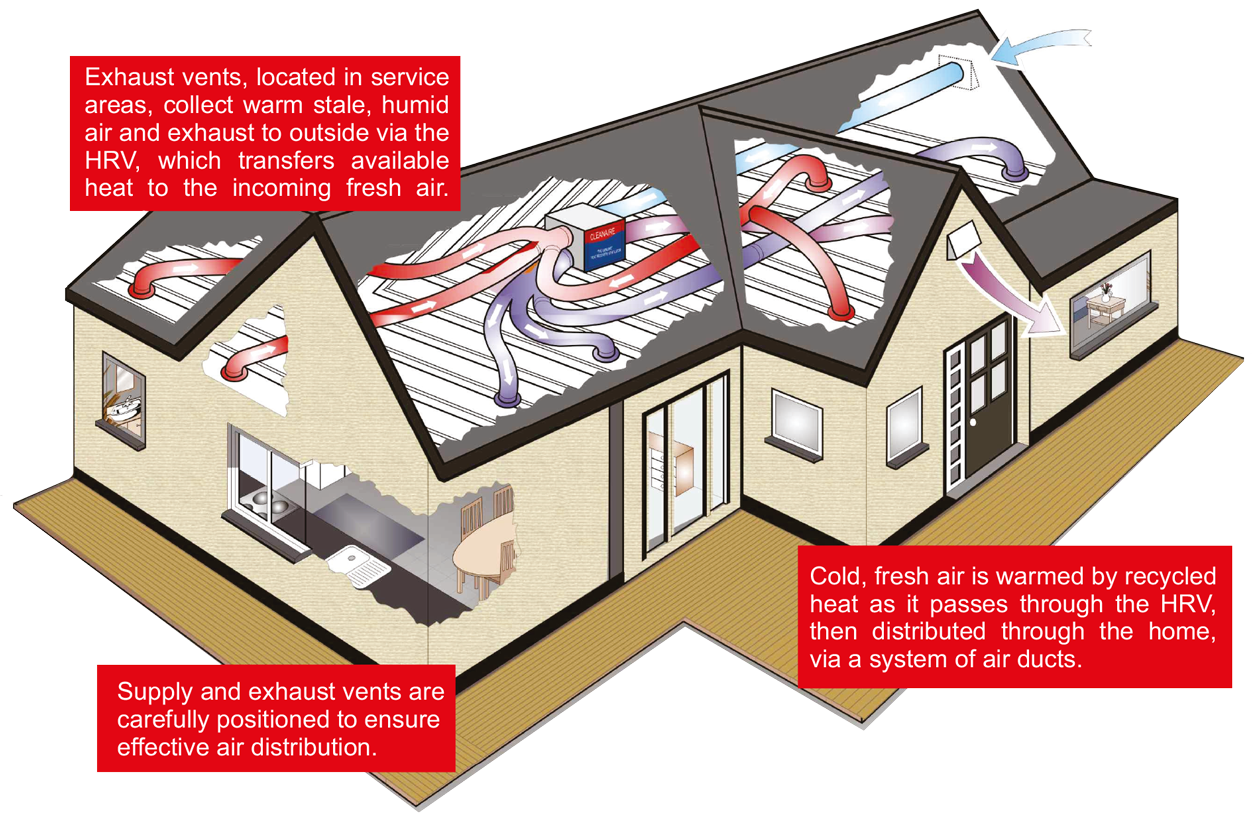
Identify where the Cleanaire HRV will be best located. Consider a location where…
-
The HRV can be easily accessed for future maintenance.
-
The HRV is best located in the roofspace over a bathroom, hallway, or service area, and close to a manhole.
-
Any fan noise is not likely to be a problem ie…. do not position the Cleanaire HRV over a bedroom.
- There is sufficient space to run ducting from the Cleanaire HRV to supply and exhaust terminals throughout the house.
- Duct runs are optimised to the shortest overall (to reduce air pressure losses).
-
Consider locations for the outdoor air supply, and the exhaust air discharge to outside (these must be reasonably separated – minimum 3m – to ensure that exhaust air is not collected by the fresh air intake).
-
See Ducting & Diffusers (in the Products section) for the types of outlets available as standard — if your home needs something special — contact us using any of the means on our Contact page .
Step 3
Determine which size HRV for your home… for this example assume that the home needs a fully ducted system.
1. The Building Code (NZS 4303) calls for home ventilation at the rate of .35 Air Changes per Hour. 0.35 is approximately 1/3 of all the air in the home every hour.
2. Calculate the internal volume of your home.
If you have builders plans use a scale rule to measure the floor area, and the average height. Multiply the floor plan area by the average internal height. Otherwise you will have to measure the house.
There are two methods….
Measure each room and hall and cupboard, that is within the area to be ventilated. – you need to measure the floor area, and the height of each and every space. Then add all the volumes to arrive at a total volume.
A second way is to measure the house from the outside, length X width in metres (this is easiest with a single level home)
— Multiply the external dimensions to get the total area of the house
— Subtract the floor area of spaces that are not to be ventilated — ie …. the garage.
— Multiply by the indoor height of the living space — this is usually 2.4 metres.
— The answer is the total internal volume in cubic metres. Now select the appropriate model from the model chart on page 4 of the CLEANAIRE brochure.
TYPICAL VILLA
Floor Area (M2)
Up to 150
Internal Volume (m3)
360
Minimum air flow to comply with NZ4303 (m3 per hour)
126
Recommended HRV Model
CL130
LARGE HOME
Floor Area (M2)
Up to 235
Internal Volume (m3)
564
Minimum air flow to comply with NZ4303 (m3 per hour)
198
Recommended HRV Model
CL200
LARGER HOMES
Floor Area (M2)
Up to 350
Internal Volume (m3)
840
Minimum air flow to comply with NZ4303 (m3 per hour)
294
Recommended HRV Model
CL300
Draw a simple plan of your home, with dimensions (as described above) and send it to us. (See Contact page for details).
We will check and confirm your model selection.
We can only confirm where there is sufficient information, do not call us unless you have provided us a simple plan which shows floor plan (with each room and dimensions, a “side elevation” that shows ceiling heights, and a clear indication (Arrow) of where North is on your plan. Include a contact phone number, and return mailing address.
5. Measure the size of the manhole opening, and the available height above the manhole to the underside of the roof – it is important that the HRV can be installed. (where this may be a problem, email us a brief plan and we will have a solution. (Most HRVs can be “knocked down” then passed into the roof space in sections and re-assembled when in the roof space)
6. For large homes, where there is a lot of ducting, it is often more economical to install two HRVs.
CONTACT US.

Email: info@avonelectric.co.nz
Products are New Zealand made by Avon Electric Ltd.
Ph: 03 381-5595 - Fax: 03 381-5596